 Submitted by matt_eaton
on Wed, 05/30/2018 - 09:05 PM
Submitted by matt_eaton
on Wed, 05/30/2018 - 09:05 PM


When the Swift language went into development one of the goals it set out to achieve was to provide a better developer experience than the one that currently existed and to provide long term support against legacy C and Objective-C APIs. Now that these goals have been achieved the Swift community is widening it's support to working with dynamic languages such as Python, Ruby, JavaScript, and Perl in Swift 4.2's language addition for Dynamic Member Lookups. Providing support for these dynamic languages opens up Swift to be applied in new niche areas such as Swift on the server and Swift for data science. The challenge with opening up support for dynamic languages is that Swift has a static type system and languages like Python and JavaScript are dynamically typed languages. Meaning that their types are inferred and can possibly be changed around at run-time. Luckily, languages like Python has C / C++ extensions that can be called into to create a bridge between Swift and Python. And that is the reason I wanted to write this article, to show how to interop between Swift and a dynamic language like Python and to illustrate how the new Dynamic Member Lookup feature makes this a lot easier. Let's jump in!
NOTE: The code used in this article has been tested using Python 2.7.10 and Swift 4.2 on Ubuntu 16.04 and macOS 10.13. This code has not been tested in an Xcode Playground. Also please note that the PythonBridge.swift file used in this article was written by the Swift community. I refactored it for the demonstration purposes for this article, but I did not originally write it. If you are planning to build a Swift and Python interop layer for production use, then I would start from the ground up using the Python C extensions as a guide. (Also, if you are planning on writing a Swift and Python interop layer and are looking for help, please let me know! Would love to join in.)
Why Swift and Python 🐍
So, why interop Swift with Python? What real world advantage does this give Swift? For starters, Swift can utilize the extensive data science libraries that Python has cultivated over the last 25 years. As an example Swift could setup a Python interop that crunches data using NumPy and returns it to Swift for display on a web application. Another great advantage would be to setup an interop that exposes Swift to machine learning libraries like Google Brain. This allows the data-pipeline work to be done in Swift instead of Python. Ultimately gaining performance out of Swift's static type system as it filters the data to Python.
Getting Started 🚀
In getting started with this post I wanted to demonstrate a Python interop that could be used in a data-pipeline, on a server, or a macOS application. The following example loads a Python module, creates a Python object and then executes a few Swift tests to access the computed data on that Python object. All of the computation in this example is done using Python's NumPy package and is a perfect example of the data science capabilities that can be leveraged from Swift with Python. To get this example up and running there are a few requirements and installation steps that need to be covered:
- Make sure you have at least the Swift 4.2 toolchain installed. The latest Swift toolchains can be downloaded here.
- Make sure you have the Python package NumPy and Compute module installed in the system-wide package folder. NumPy should be installed using pip and the Compute module could be installed by hand.
- Make sure you know where your Python umbrella header is located on your system. Check this folder to be sure:
# Check the /usr/include folder for the Python umbrella header.
$ ls /usr/include/python2.7/Python.h -l
Compute Module 🔢
Now that the Compute module and NumPy are installed let's take a quick look under the hood at the Compute module. The first thing I want t to point out is that the NumPy package is loaded into the compute module to take advantage of NumPy's numerical APIs. Second thing I want to point out is that data is passed into the compute class during the construction of the object and set to instance variables. Using the @dynamicMemberLookup attribute then Swift is able to pull this data out of the compute class just like it would any Swift instance variable.
compute.py
# -*- coding: utf-8 -*-
#

import os, sys
import numpy as np

class compute:

    def __init__(self, dynamic_text, numeric_list):
        self.dynamic_text = dynamic_text
        self.static_text = "Hello from Python"
        self.numeric_list = numeric_list

    def get_static_text(self):
        return self.static_text

    def get_dynamic_text(self):
        return self.dynamic_text

    def add_to_list(self, added_values):
        self.numeric_list = self.numeric_list + added_values


    def get_mean(self):
    	if self.numeric_list.count > 0:
    		return np.mean(self.numeric_list)
    	else:
    		return -1

    def get_median(self):
    	if self.numeric_list.count > 0:
    		return np.median(self.numeric_list)
    	else:
    		return -1

    def get_min(self):
    	if self.numeric_list.count > 0:
    		return np.amin(self.numeric_list)
    	else:
    		return -1

    def get_max(self):
    	if self.numeric_list.count > 0:
    		return np.amax(self.numeric_list)
    	else:
    		return -1

    def get_standard_deviation(self):
    	if self.numeric_list.count > 0:
    		return np.std(self.numeric_list)
    	else:
    		return -1

    def get_square_root(self):
    	if self.numeric_list.count > 0:
    		return np.sqrt(self.numeric_list)
    	else:
    		return [-1]
The Python Bridge Library 📘
To call into the Python Compute module from Swift I setup a Swift Library called Python Bridge. This library consists of a module map that loads the Python umbrella header, a Swift bridging layer that interacts with Python's C extensions, and a XCTest that tests computing data with Python using both subscript lookup's and the @dynamicMemberLookup attribute. To get a deeper understanding of how the Python Bridge Library is setup, check it out on my Github account here. First let's take a brief look at loading the Python umbrella header. The reason it is important to load this header when compiling our library is because this will expose all of the Python C extensions that are later used in the PythonBridge layer.
I included a Linux and macOS directive here to point to the system level Python header, but you could set this up with a custom version of Python installed anywhere on your system.
CPython.h
// Point to the Python.h header file on Linux or macOS.
#ifdef __linux__
#include "/usr/include/python2.7/Python.h"
#elif __APPLE__
#include "/usr/include/python2.7/Python.h"
#else
#error Was not able to detect the operating system properly.
#endif
Now that Python's C extensions are exposed to Swift let's take a look at a few important examples from the PythonBridge.swift file. One of the first things Swift needs to do is to initialize Python's top level interface so Swift can use it. To accomplish this the CPython module is loaded into the bridging file at the very top. From here, Python is then initialized around line 565. Right above the initialization process the Python constant is set so that this value can be used as a global constant when needing to interact with Python at the top level, such as importing modules into Swift.
PythonBridge.swift
import CPython

...

public let Python = PythonInterface()

public struct PythonInterface {
  /// This is a hash table of the builtins provided by the Python language.
  public let builtins : PyVal

  init() {
    Py_Initialize()   // Initialize python
    builtins = PyVal(borrowed: PyEval_GetBuiltins())
  }

  public func `import`(_ name: String) -> PyVal {
    guard let pyModule = PyImport_ImportModule(name) else {
      fatalError("Could not import Python module \(name)")
    }
    return PyVal(owned: pyModule)
  }


  // TODO: Make the PythonInterface type itself `DynamicCallable`, so that
  // things like Python.open" naturally resolve to Python.get(member: "open")
  // and all the builtin functions are therefore available naturally and don't
  // have to be enumerated here.
  public var isinstance : PyVal { return builtins["isinstance"] }
  public var len : PyVal { return builtins["len"] }
  public var open : PyVal { return builtins["open"] }
  public var print : PyVal { return builtins["print"] }
  public var repr : PyVal { return builtins["repr"] }
  public var str : PyVal { return builtins["str"] }
  public var type : PyVal { return builtins["type"] }
}
Now that Python has been initialized, the bridging file next defines a type called PyVal that Swift and Python will use to exchange data between each other. There are many extensions in this bridging file for the PyVal type, but the main struct is defined around line 61. One thing you may notice right away is that I have applied the @dynamicMemberLookup attribute to this type that follows right along with how this attribute works in the proposal. (More on this in a minute)
PythonBridge.swift
/// This is the currency type for Python object references.  It is passed to and
/// returned from Python calls and member references, and is overloaded to
/// support the standard operations that Python supports.
@dynamicMemberLookup
public struct PyVal {
  /// This is the actual handle to a Python value that we represent.
  fileprivate var state : PyRef

  init(_ value : PyRef) {
    state = value
  }
  public init(owned: OwnedPyObject) {
    state = PyRef(owned: owned)
  }
  public init(borrowed: UnsafeMutablePointer<PyObject>) {
    state = PyRef(borrowed: borrowed)
  }

  fileprivate var borrowedPyObject : UnsafeMutablePointer<PyObject> {
    return state.borrowedPyObject
  }
  fileprivate var ownedPyObject : OwnedPyObject {
    return state.ownedPyObject
  }

  // This usage is taken right from the proposal exmaple.
  // https://github.com/apple/swift-evolution/blob/master/proposals/0195-dynamic-member-lookup.md#example-usage
  subscript(dynamicMember member: String) -> PyVal {
    get {
      let result = PyObject_GetAttrString(borrowedPyObject, member)!
      return PyVal(owned: result)
    }
    set {
      PyObject_SetAttrString(borrowedPyObject, member,
                             newValue.borrowedPyObject)
    }
  }
}
Now that Python is initialized and Swift has created a bridging type, let's test out interaction with Python with an few XCTest cases. In the PythonBridgeTest.swift file a few things may look a bit odd. First, you will probably notice that I am loading the computeModule as a class constant, just like I would in Python. Next, in my setup function I am taking a simple Swift array and transforming it into a PyVal type, with the exact same data. Lastly, I am using the pre-loaded computeModule object, subscripting a member of that object, i.e., compute, and creating a new Python object with a string and list during class construction. I am now ready to start executing my tests and accessing Python data!
PythonBridgeTests.swift
import XCTest
@testable import PythonBridge

final class PythonBridgeTests: XCTestCase {

    let computeModule = Python.import("Compute.compute")
    let swiftArray: [Int] = [2, 4, 6, 8, 10]
    var computedInstance: PyVal?


    override func setUp() {
        super.setUp()
        // Transform a Swift array to a PyVal that can be read as a list.
        let numeric_list: PyVal = PyVal(arrayContentsOf: self.swiftArray)
        // Subscript a member of the computeModule to create a compute object.
        // Upon construction of the object, pass in a string and list.
        self.computedInstance = computeModule.get(member: "compute").call(args: "Python Bridge", numeric_list)
    }

    ...
}
Now that our test has the computedInstance object loaded with some string and numerical data, let's actually test accessing this data using a subscript and then using the @DynamicMemberLookup attribute. To do this I setup a test case called testComputeMembers and I am performing two XCAssertEqual operations on the same property of the computeInstance. The first operation I subscript the member, cast it as a string, and then perform the XCAssert comparison. The next operation, I perform the some thing, but instead of subscripting I now use the dot syntax that the @dynamicMemberLookup attribute provides. Remember, this attribute was added to the PyVal struct, so any property that is exchanged as a PyVal can potentially be open for this usage.
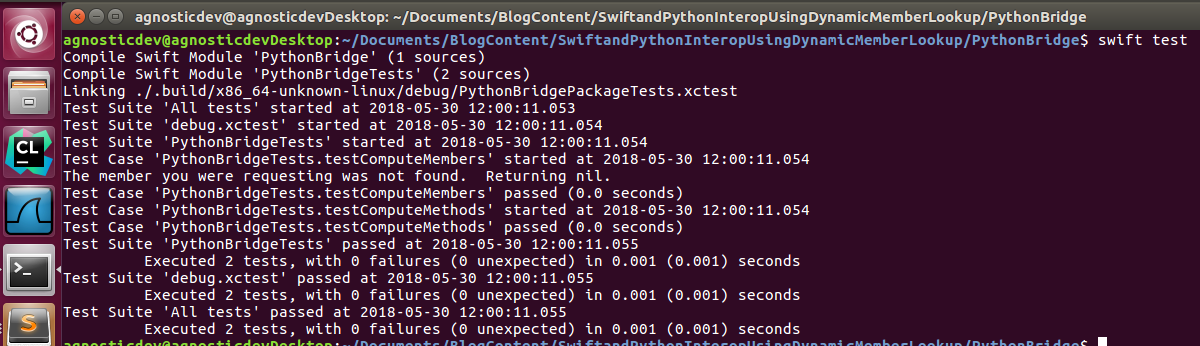
In the following screen shot above you can see that when the XCTest case is run in the terminal that the PythonBridgeTests.testComputeMembers test passed! Meaning that we are now interoping with Python successfully using both techniques!
PythonBridgeTests.swift
func testComputeMembers() {

    // The first test below is designed to call into computedInstance
    // and test the equality of a member using an explicit lookup.
    //
    // The second test is designed to also test equality but using the
    // dot syntax with the @dynamicMemberLookup functionality instead.

    // ## Test: 1
    // Test that we can get static data from the computedInstance.
    // Accessing this member does not use dot syntax.
    let pyValStaticText = computedInstance?.get(member: "static_text")
    XCTAssertEqual(pyValStaticText?.asString(), "Hello from Python")

    // ## Test: 2
    // Test that we can call a dynamic member in the compute class
    // and use @dynamicMemberLookup to access this member with the dot syntax.
    // This specific example is grabbing a string.
    let pyValDynamicMemberText = computedInstance?.static_text
    XCTAssertEqual(pyValDynamicMemberText, "Hello from Python")

    // ## Test: 3 - Also using @dynamicMemberLookup.
    // This test also uses the dot syntax but instead grabs a numeric list/array.
    // A subscript is used to then compare two values.
    guard let swiftArray = computedInstance?.numeric_list else {
	XCTFail("Numeric List was not unwrapped properly")
	return
    }
    XCTAssertEqual(swiftArray[2], 6)

}
Now that we can access Python data successfully from Swift, let's perform some data computation using NumPy to provide a read world example of how this might be used in an application. To do this I setup another test case called testComputeMethods. These operations work a bit differently than accessing members of a class because there is no attribute helper for calling a method so everything has to be subscripted. (There is one in the works though!) In the first and second example I am using the computedInstance object to subscript the methods get_mean and get_min members. Chained to those subscripts is the call() function to invoke these methods in Python to return the respective mean and minimum values from the compute class.
The third example is very much like the first two but instead I pass in a new list to be concatenated to the compute objects's numerical list. From there the get_mean method is then called again and the new mean value is checked using the XCAssert comparison to result in a brand new mean value. The third example is more of a real world scenario that you would see in a production application and that is why I wanted to provide it.
PythonBridgeTests.swift
func testComputeMethods() {

    // The tests below are to provide examples of calling methods of the
    // computedInstance and checking the return values.
    // The return values are cast to numeric values in the PythonBridge instead
    // of the currency PyVal object.
    //
    // The proposal for @dynamicCallable will make the below example possible.
    // Until then .call() method will need to be used to explicitly call members
    // of the PyVal object.
    // let v = computedInstance.get_mean()
    //

    // ## Test: 1
    // Test that we can get the mean back from NumPy and test it in Swift
    // Provids a PyVal object that contains the mean
    let pyValMean = computedInstance?.get(member: "get_mean").call()
    XCTAssertEqual(pyValMean?.asDouble(), 6.0)

    // ## Test: 2
    // Test the min value received back from NumPy
    // Provids a PyVal object that contains the min
    let pyValMin = computedInstance?.get(member: "get_min").call()
    XCTAssertEqual(pyValMin?.asInteger(), 2)

    // ## Test: 3
    // Test adding values to the numeric list and then recomputing the mean.
    let swiftPrimes = [19, 23, 29]
    let pyValPrimeList: PyVal = PyVal(arrayContentsOf: swiftPrimes)
    computedInstance?.get(member: "add_to_list").call(args: pyValPrimeList)

    // The new recomputed means as a double or integer
    let pyValNewMean = computedInstance?.get(member: "get_mean").call()
    XCTAssertEqual(pyValNewMean?.asInteger(), 12)
    XCTAssertEqual(pyValNewMean?.asDouble(), 12.625)

}
In Summary ⌛️
In summary I hope you have enjoyed this blog post and now know a little bit more about why you would want to interop Swift and Python. I hope you also enjoyed the examples and now know how to interop with Swift and Python with and without using the @dynamicMemberLookup attribute. I am very much looking forward to seeing what traction the @dynamicCallable proposal will get and if that is a new language feature coming for Swift 5. And also looking forward to seeing what is in store for Swift and Python this year at WWDC! Please if you have any questions comments or concerns, leave a comment and I will get back to your as soon as I can. Thanks!

Member for
3 years 9 monthsLong time mobile team lead with a love for network engineering, security, IoT, oss, writing, wireless, and mobile. Avid runner and determined health nut living in the greater Chicagoland area.
Comments
Compute module installation
Hi Matt, can you please elaborate " Compute module could be installed by hand". What is the compute module is it a plugin or just compute.py file, the link added in blog takes me to compute.py file. I am getting this error "fatal error: Could not import Python module Compute.compute".
Ankita, yeah no problem. I…
Ankita, yeah no problem. I reference that "the Compute module could be installed by hand," because I do install this module using Pip or any other package manager. For demonstration purposes I install Compute by hand to /usr/local/lib/python2.7/dist-packages on Linux so this module can be picked up on Linux just as Numpy would.
The compute module is intended to be a Python module, yes. Please let me know if this answers your question or if you are still having problems.
It works for me now
Thanks Matt, for the clarification, initially I was not able to install Compute.py. now I manually copied it to the site-packages folder of python so it works now, Thanks. I am using Mac and it works on 10.13.6. I also wants to know that do you know how to call swift framework or app from python. I have a swift project and I want to call few exposed functions from python script. do you know how to do that.
Ankita, yes, calling into…
Ankita, yes, calling into Swift from Python can be done. The idea is very similar to the idea in this post in that you want to create a Swift module that exposes methods to Python and then use C to call into Swift from Python. From there you will need to map the types coming out of Swift back to a PyObject. Essentially, your currency type. Hope this helps.
Can we do it without a C…
Can we do it without a C layer in middle?
My first thought is no,…
My first thought is no, because that is the common ABI between them, but let me think on that.
iOS specific example
Hi Matt, great article! I was wondering if you could do a similar one where you import Python into an iOS app.
If not, any suggestions would be much appreciated.
Same
I'm also looking for a way to run Python code alongside Swift for iOS app as well, though XCode.
David and Cheeki. Thanks…
David and Cheeki. Thanks for reading! Currently, I am unaware of a technique to run Python alongside Swift in an iOS app. This article is more focused on macOS and data pipelines.
One thing to keep your eye on is the PythonLibrary work going on in the Swift stdlib right now though. For example, look at the work being done in this PR: https://github.com/apple/swift/pull/20674
This is a great research topic, as I find out more I will keep posting here.