 Submitted by matt_eaton
on Sun, 11/26/2017 - 06:39 PM
Submitted by matt_eaton
on Sun, 11/26/2017 - 06:39 PM


Have you ever found yourself in a situation where you needed to test the networking functionality on your iOS or macOS app over a period of time to see how it reacts? Have you ever found yourself questioning whether or not network conditions during a specific time of day would play an impact on your application's performance or whether it was all just a coincidence? Well, I recently have, and these are real questions that I found myself trying to test and answer with measurable consistent results. Measurable results that will allow me to make the most informed decisions possible on my network development strategies. And that is exactly why I wanted to write this post, to explain how I used Python to automate XCTestCases to generate measurable results over a period of time to define the clearest path forward in your network development strategy.
One question you may be wondering right away is; how does Python play a role in measuring network performance in the context of an iOS or macOS applications? Well, my overall goal, regardless of Python, was to find a tool that is flexible, light-weight, and does a great job at string parsing to call into an XCTestCase on specific time intervals from a Cron job. To achieve this I could have used Ruby, Swift, or maybe even even JavaScript, but Python fits all of those things, and plus, as an added bonus, I am lover of Python as well so that does not hurt either. 😀
The overall goal I was trying to achieve is to create a Python testing tool that will allow me to invoke an Xcode XCTestCase from the command line to call into an iOS or macOS application. From here I can invoke the networking stack in the native application and make networking request, just as the application would. The last step would then be to measure the total network latency that it took to make that request and record the latency time to be acted upon later. Enough explanation, let's take a look at the code! 🎉
To grab a full copy of the example code that is about to be covered, head on over to my Github page here.
Python Testing Tool 🐍
The Python testing tool is relatively small tool. I combined the complete network testing code below into one file so that it could be condensed enough for demonstration purposes, but overall it is part of a much larger testing framework that I developed for working with Xcode. 😀
The Python testing tool performs four specific operations. First, it takes a file input from either STDIN or as an argument on the command line. The data that is contained in this file input is a list of URLs that will be read and set to the Python list, file_lines. Second, the URLs are looped through two at a time, and are passed into an XCTestCase where the execution of this tool is halted until STDOUT is fully returned from the xcodebuild command. The xcodebuild command runs the test on either a static or predefined set of macOS or iOS hardware devices to simulate real world scenarios. Third, the string output returned from the execution of the XCTestCase, in the form of STDOUT, is then parsed by a mini parser and the network latency times are picked out and saved to memory. Finally, but not shown in this example, is the option to save these network results to a persisted store to be acted upon later to show the tested results over a series of time.
The file input of URLs passed in during the execution of this tool is just a text based list of URLs that the Python testing tool consumes and separates into memory. To review the details of this file, follow this link to my Github here.
Python Testing Code 🐍
#!/usr/bin/env python
# -*- coding: utf-8 -*-
#
# Usage:
#  $ ./test_network.py urls
#  $ ./test_network.py < urls
#
# Import needed stdlib and other dependencies
#
from __future__ import print_function
import os, sys, time, subprocess

def cutOutNextOccurrenceOfString(std, needle, endKeyWord):
    v = std.find(needle)
    if v != -1:
        rtn_str = ""
        let = (v + 1000)
        while v < len:
            char = std[v]
            if char is endKeyWord[0]:
                next_char = endKeyWord[1]
                next_next_char = endKeyWord[2]
                next_std = std[(v+1)]
                next_next_std = std[(v+2)]
                # Consider a three char match good enough
                if next_std is next_char and next_next_std is next_next_char:
                    break
            rtn_str += char
            v += 1
        std = std[v:]
        return (1, std, rtn_str)
    else:
        return (-1, std, "")

# Main function
def main():
    # Create some local variables
    file_input_name = ""  # Input name for the file being passed in by the command line
    complete_content = "" # The string contents of the file
    file_lines = [] # A list of lines that the complete_content will be exploded to
    file_input_stdin = None # File from stdin, i.e., < input.txt

    print("----------------- Starting Program -----------------")
    # ---------------- Parse the command line input ----------------

    # Use sys.argv or sys.stdin to get the file input from the command line
    if len(sys.argv) > 1 and sys.argv[1] is not None:
        # Recognize that sys.argv has a file argument in it
        file_input_name = sys.argv[1]
    elif not sys.stdin.isatty():
        # isatty() makes sure stdin has data http://man7.org/linux/man-pages/man3/isatty.3.html
        # Recognize that there is a file object in sys.stdin
        file_input_stdin = sys.stdin
    else:
        # Write the raised error
        error_raised = "OOPs! It seems that there was an issue locating your input file"
        # Display the error to the console
        print(error_raised)
        exit("Please provide a valid filename or file as a command line input argument")


    # Check whether the file_input_name from sys.argv is actually a valid file
    if file_input_stdin is None:
        if not os.path.isfile(file_input_name):
            # Write the raised error
            # Display the error to the console
            print("OOPs! It seems there was an issue locating your filename")
            exit("Please provide a valid filename")

        # ---------------- Attempt to open the file ----------------

        # Open file, read contents into a list to be parsed
        try:
            # Open the file and read the contents into a
            if file_input_stdin is None:
                with open(file_input_name, 'r') as file:
                    complete_content = file.read()
            else:
                complete_content = file_input_stdin.read()

            # Explode or split the string contents to a list
            file_lines = complete_content.split("\n")

        except ValueError:
            # Write the raised error
            error_raised = "Unexpected error loading file: " + str(sys.exc_info()[0])
            # Display the error to the console
            print(error_raised)
            exit("This program needs an input file to continue. Exiting...")

        # ---------------- Parse the file ----------------
        urls = ""
        i = 0
        url_list = []
        log = ""

        for url in file_lines:
            i += 1
            print(url)
            urls += url + ","

            if i % 2 == 0:
                if urls.endswith(","):
                    urls = urls[:-1]

                test_command = "xcodebuild \
                                -project '../Agnostic Development.xcodeproj' \
                                -scheme AgnosticDevelopmentLatencyTest \
                                -destination 'platform=iOS,name=Matts iPhone 7+' \
                                URL_ARGS=" + urls +" \
                                clean test"

                print("Working...")
                stdout_response = subprocess.check_output(test_command,stderr=subprocess.STDOUT,shell=True)
                flag = 1
                while flag is 1:
                    tuple = cutOutNextOccurrenceOfString(stdout_response, "SUCCESS", "|DONE|")
                    flag = tuple[0]
                    stdout_response = tuple[1]
                    log += tuple[2] + "\n"

                urls = ""
        print(log)
        print("----------------- Ending Program -----------------")
        exit()
    else:
        # Write the raised error
        error_raised = "OOPs! It seems that there was an issue locating your input file"

# Execute the main function
if __name__ == '__main__':
    main()
Setting up the XCTestCase in Xcode 💻
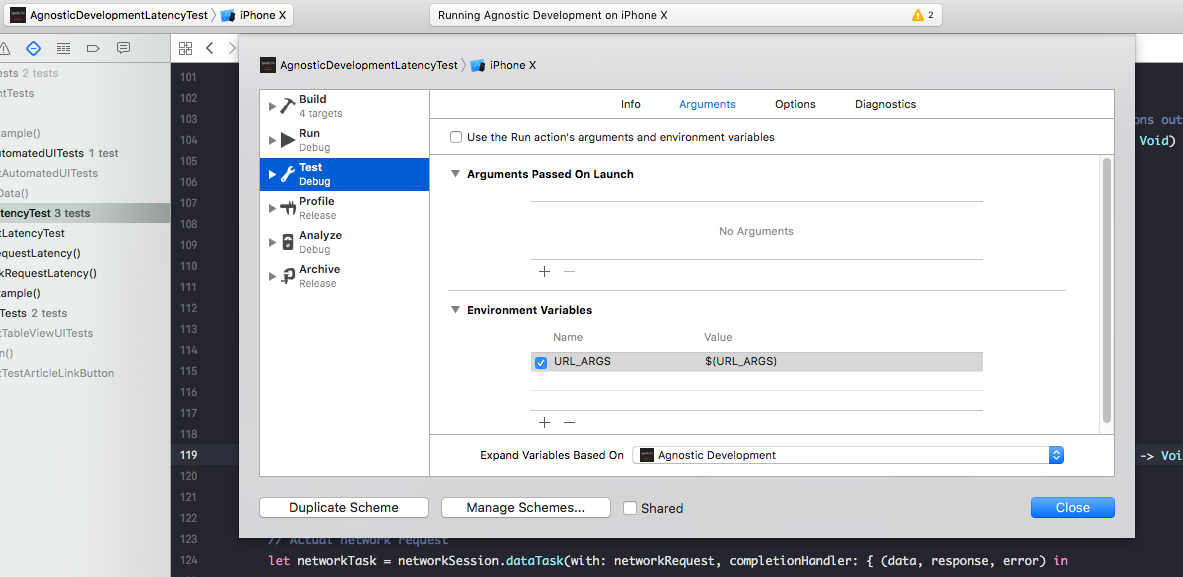
First things first. It's time to setup my XCTestCase bundle. In this case I have setup a bundle called AgnosticDevelopmentLatencyTest to use the main application target, 'Agnostic Development' when the XCTestCases for AgnosticDevelopmentLatencyTest are executed. Another step I need to take is to setup an environment variable to accept command line arguments when Python uses xcodebuild to execute the XCTestCases. In this specific case I setup a variable called URL_ARGS. To set these two items up, select the AgnosticDevelopmentLatencyTest test bundle and then select edit schemes.
Review Application Code for Testing 💻
The next logical step before any testing code is written is for me to take a look at the application code that is being tested and make sure that this code is setup for testing. In this case the Network object is setup as a static singleton object and so the public instance methods on the Network object are easily testable. Perfect! 👍 No extra work needed here. We can call right into the runNetworkingRequests method with no issues. Before I am done with the Network singleton though, I'll need to add two small items for my Python tool to easily capture the output of the network request. First, I'll add a small elapsed time calculation using timeIntervalSinceNow when the dataTask completes. Second, I'll add a few tokens to our Python STDOUT completion message so our Python parser can key on these token and grab the network latency from them.
"SUCCESS: Latency Elapsed: \(elapsed_start) for URL: \(url) |DONE|"
or if a failure:
"FAIL: Latency Elapsed: \(elapsed_fail) for URL: \(url) |DONE|"
A full example of the Network singleton is found below that includes these two small additions.
class Network: NSObject {

    //
    // MARK: - Shared instance property
    //
    public static var shared = Network()

    //
    // MARK: - Public instance properties
    //
    public weak var networkDelegate: NetworkProtocol?

    //
    // MARK: - Private constants
    //
    private let url = "https://5fc3d7589074cd0c4bf5-79ef711e857aec8d77eb74e0027f6262.ssl.cf1.rackcdn.com/articles.json"
    private let urlConfiguration = URLSessionConfiguration.default

    //
    // MARK: - Public Instance Methods
    //

    // Load articles over the network with a default completion block provided by URLSession
    public func loadNewArticlesWithDefaultCompletion() {

        guard let articleURL = URL(string: url) else {
            return
        }

        var articleRequest = URLRequest(url: articleURL)
        articleRequest.httpMethod = "GET"

        let urlSession = URLSession(configuration: urlConfiguration)

        // Create a dataTask with a closure that defines the comletion handler
        // The closure in this case is defined as completionHandler: { (data, response, error) in  ... }
        let articleTask = urlSession.dataTask(with: articleRequest, completionHandler: { [weak self] (data, response, error) in

            // Ensure that an error is not present, otherwise, return the error
            guard error == nil else {
                // Usage of weak self to reference networkDelegate
                DispatchQueue.main.async {
                    self?.networkDelegate?.networkReceivedError(error: error.debugDescription)
                }
                return
            }

            // Ensure that the network data is available and that the byte count is greater that zero
            guard let networkData = data, networkData.count > 0 else {
                DispatchQueue.main.async {
                    self?.networkDelegate?.networkReceivedError(error: "There was an error parsing network data.")
                }
                return
            }

            // Perform the JSONSerialization into an array of Dictionaries
            // Next use the convenience constructor in Article to create an Article object out of each object in the JSON array
            do {
                if let networkArticles = try JSONSerialization.jsonObject(with: networkData, options: []) as? [[String: AnyObject]] {
                    var articles: [Article] = []

                    // Create article objects out of a JSON object
                    for networkArticle in networkArticles {
                        let article = Article(jsonObject: networkArticle)
                        articles.append(article)
                    }
                    DispatchQueue.main.async {
                        self?.networkDelegate?.articlesFinishedLoading(articles: articles)
                    }
                }
            } catch let error as NSError {
                DispatchQueue.main.async {
                    self?.networkDelegate?.networkReceivedError(error: error.debugDescription)
                }
            }

        })
        articleTask.resume()
    }

    // Load articles over the network with a assigned completion as a passed in argument : networkArticlesCompletionHander
    // networkArticlesCompletionHander is a closure defined as a variable to handle all of the processing without using URLSessions out of the box completion handler
    public func loadNewArticlesWithAssignedCompletion(networkArticlesCompletionHander: @escaping(Data?, URLResponse?, Error?) -> Void) {

        guard let articleURL = URL(string: url) else {
            return
        }

        var articleRequest = URLRequest(url: articleURL)
        articleRequest.httpMethod = "GET"

        let urlSession = URLSession(configuration: urlConfiguration)

        let articleTask = urlSession.dataTask(with: articleRequest, completionHandler: networkArticlesCompletionHander)
        articleTask.resume()
    }

    public func runNetworkingRequests(networkRequest: URLRequest, networkSession: URLSession, completion: @escaping (_ : String) -> Void) {
        var results: String = ""
        let start = Date()

        // Actual network request
        let networkTask = networkSession.dataTask(with: networkRequest, completionHandler: { (data, response, error) in

            guard let url = response?.url else {
                return
            }
            if let _ = data {
                let elapsed_start = abs(start.timeIntervalSinceNow)
                results = "SUCCESS: Latency Elapsed: \(elapsed_start) for URL: \(url) |DONE|"
                DispatchQueue.main.async {
                    print(results)
                    completion(results)
                }
            } else {
                let elapsed_fail = abs(start.timeIntervalSinceNow)
                results = "FAIL: Latency Elapsed: \(elapsed_fail) for URL: \(url) |DONE|"
                DispatchQueue.main.async {
                    print(results)
                    completion(results)
                }
            }
        })
        networkTask.resume()
    }
}
Create and Setup the XCTestCase 😀
The next step will be for me to start building out our Swift XCTestCase. First, I'll add the @testable import of Agnostic_Development so that I can call into our Network singleton object. Next, I'll setup the necessary instance properties to build an array of URLSessions from the data passed in off the command line. The ProcessInfo.processInfo.enviornment["URL_ARGS"] object will allow XCTestCase to captures the URLs strings passed in and complete this work.
import XCTest
@testable import Agnostic_Development

class AgnosticDevelopmentLatencyTest: XCTestCase {
    //
    // MARK: Public Constants
    //
    public let urlConfiguration: URLSessionConfiguration = URLSessionConfiguration.default
    //
    // MARK: Public Instance Properties
    //
    public var urls: [String] = []
    public var networkRequests: [URLRequest] = []
    public var networkSessions: [URLSession] = []
    public var results: [String] = []

    override func setUp() {
        super.setUp()

        // Parse the comma separated TEST_ARGs variable
        if let TEST_ARGS_URLS = ProcessInfo.processInfo.environment["URL_ARGS"] {
            urls = TEST_ARGS_URLS.components(separatedBy: ",")
            NSLog("Launch Data URL Count: \(urls.count)")
        } else {
            // If you do not get any test args, assert failure
            XCTAssert(false, "FAIL: No data found in TEST_ARGS_URLS")
        }

        // Put setup code here. This method is called before the invocation of each test method in the class.
        for networkURL in urls {
            guard let networkURLObj = URL(string: networkURL) else {
                return
            }
            var networkRequest = URLRequest(url: networkURLObj)
            networkRequest.httpMethod = "GET"
            networkRequests.append(networkRequest)

            let networkSession = URLSession(configuration: urlConfiguration)
            networkSessions.append(networkSession)
        }
    }

    override func tearDown() {
        // Put teardown code here. This method is called after the invocation of each test method in the class.
        super.tearDown()

    }

    ...

}
Create the Network Testing Method 😀
The next step I need to take is to invoke and execute the network test. To do so properly, and to make sure the XCTestCase gives the network request enough time to return, I setup an XCTestExpectation to wait to fulfill for 15 seconds. That way the test does not complete without the networking request returning. Upon returning of the networking request, either set an XCAssert to either true or false and fulfill the XCTestExpectation. This action, in turn, completes the XCTestCase and the output is recorded by Python and the string output can be parsed to identify the network latency returned from the device. 🎉
That's it. I can further perform tearDown() or optionally add on to this procedure, but this code now should be able to be executed on either a single piece of hardware or multiple sets all at once from one command on the command line. 💻 🖥 📱
func testFirstNetworkRequestLatency() {

    guard let url = networkRequests[0].url,
        networkRequests.count > 0 else {
        return
    }
    let expectation = XCTestExpectation(description: "Download from: \(url)")
    Network.shared.runNetworkingRequests(networkRequest: networkRequests[0], networkSession: networkSessions[0]) {
        (result: String) in
        if result.range(of:"FAIL") != nil {
            XCTAssert(false, "URLDebug: A failing message was found on the first execution of the request. \(result)")
        } else {
            XCTAssert(true, "URLDebug: The first execution was run successfully. \(result)")
        }
        expectation.fulfill()
    }

    wait(for: [expectation], timeout: 15.0)
}
Test Everything Out 📲
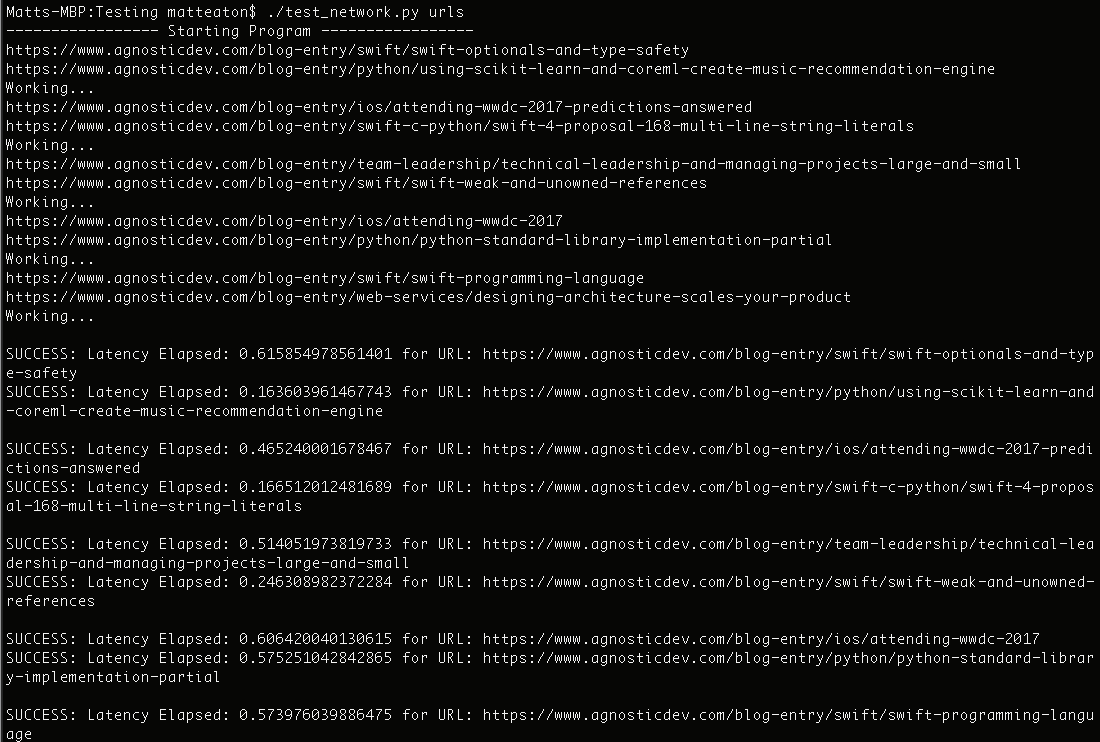
I'm going to take a look at the output of this test ran on an iPhone 7+. To do so, I'll plug my single device into my Mac and set this device to the selected device in Xcode. There is a testing directory found in the Xcode sample project for this post, I'll navigate to this directory on the command line and see the Python file . test_network.py contained in this directory along with the urls file that contains the list of URLs. From here I can execute the test_network.py tool with the following command below. The command executes the script and executes the XCTestCase and tests out two different URLs at a time and records the output. When the Python tool has finished, the following output show above will be displayed.
$ ./test_network.py urls
In Summary ⌛️
Working with Python to script out XCTestCases is flexibly and can be achieved with relatively a small amount of code. Utilizing Python gives the developer the flexibility to leverage a language that is very strong at string parsing, easy to use and setup, and a great language to setup a Cron job against. Using Python to execute XCTestCases on a timed interval allows your testing scenario to capture results and record them over a long period of time to simulate real life scenarios. These recorded results can play a role in empowering your team to make the best decisions possibly on how to move the development of your project forward.
Where to go next? You can find all of the code from this post up on my Github repo here if you want to take a look of try it out on your own. Please let me know if you have any questions, comments or concerns on any of the examples I ran through. As always, thank you for reading! 😀

Member for
3 years 9 monthsLong time mobile team lead with a love for network engineering, security, IoT, oss, writing, wireless, and mobile. Avid runner and determined health nut living in the greater Chicagoland area.
Comments
Create the Network Testing Method
Above given info are good,I feel really happy to have seen your webpage and look forward to so many more entertaining times reading here. Thanks once more for all the details.