 Submitted by matt_eaton
on Sun, 12/10/2017 - 12:27 PM
Submitted by matt_eaton
on Sun, 12/10/2017 - 12:27 PM


In my opinion one of the most overlooked features of the Xcode SDK is the ability to test UI input using XCTestCases. Testing UI input throughout the lifecycle of your application can be beneficial for a multitude of reasons. First, UI testing allows a developer to validate that given a specific set of input, the output is that the user interface will exist in a specific state. Testing user interface output provides value because this allows a developer to test such states as loading data over the network or possibly e-Commerce cart scenarios. Next, UI testing allows a developer to validate that UI elements have been wired up correctly in the application code. Testing UI elements against application code can provide value because these tests validate that given a UI element, a specific action can be triggered from this element and there are no crashers in your application logic. It is for these reasons and more that have fueled my motivation for writing this post. My motivation is to explain through example the benefit of writing UI tests that validate UI actions, and to also validate that a sequence of events exists given a specific application input.
The example project covered in this post is an iOS application that contains a UIViewController with a UITableView and a DetailViewController. The goal for my example test is to run through a sequence of UI events and validate the of state of my UI given the article input and that my application logic works correctly. To grab a full copy of the example code that is about to be covered, head on over to my Github page here.
The Application Setup 👨💻
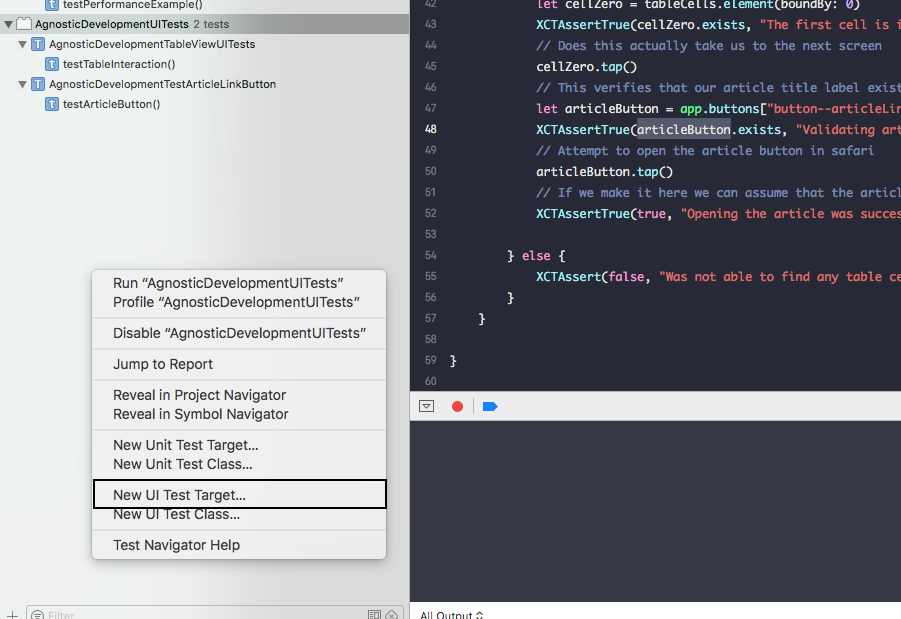
To get started the first thing that needs to be done is to add a new UI Test Target. To do this, tap on the test navigator in Xcode and right click to bring up a utility menu. From here you will want to add a new UI Test Target, as shown in the image below:
Adding a new UI Test Target will do a couple of things for your application. First, it will provide a context to write new UI Tests that is completely separate from any unit tests. This is important because UI XCTestCases behave differently and can use a different development approach than XCTestCases that are performing unit tests. Second, adding a separate Testing Target will allow you to script that target with a dynamic language like Bash or Python. This is useful because it allows a lot of flexibility in testing scenarios over a specific time interval. For example, you can pass data in a receive data back from your XCTest cases to save it future calculation. For more information on how to do this, checkout a post I wrote on how to Automate XCTest with Python.
Now that the application has a new UI Test Target, let's take a look at the actual application code that the XCTestCase will be running against. As previously mentioned, my sample project has a UITableView that needs to be to iterated through to validate that each cell navigates to the DetailViewController. That is my first goal, and will validate both that the input from the network is populating the articles in the table view, and that a user can navigate to the DetailViewController successfully from this table view. My second goal is the validation of the application code. If I can navigate to the DetailViewController, I can assert that the application code is wired up correctly.
Let's take a look at the ArticleTableViewController in the sample project. The first thing that needs to be setup is the IBOutlet for the tableView. Setting up this object allows the developer to place the accessibilityIdentifier on the tableView to make sure that this object can be queried from the XCTestCase - this will be key later on.
//
// MARK: - IBOutlets
//
@IBOutlet weak var tableView: UITableView!

...

// Tableview setup
tableView.rowHeight = UITableViewAutomaticDimension
tableView.estimatedRowHeight = 140
tableView.accessibilityIdentifier = "table--articleTableView"
Optionally, to build out this test case further, one could also navigate to the DetailViewController and tag all of the UI elements here too with accessibilityIdentifier's. This will allow for a continuation test to validate the UI elements in the DetailViewController's too.
//
// MARK: - IBOutlets
//
@IBOutlet weak var articleTitle: UILabel!
@IBOutlet weak var articleDate: UILabel!
@IBOutlet weak var articleDesc: UILabel!
@IBOutlet weak var articleLink: UIButton!

...

//
// MARK: View Controller Methods
//
override func viewDidLoad() {

    ...

    // Setup XCUITest Accessibility Labels
    articleTitle.accessibilityIdentifier = "label--articleTitleLabel"
    articleDate.accessibilityIdentifier = "label--articleDateLabel"
    articleDesc.accessibilityIdentifier = "label--articleDescriptionLabel"
    articleLink.accessibilityIdentifier = "button--articleLinkButton"
}
XCTestCase Setup 🎉
Now that the accessibilityIdentifier for the UITableView is setup it's time to create the XCTestCase for the UI test! Navigate to the new UI Test Target and click on the .swift testing class. The first thing that is needed is to setup the XCUIApplication object to be the proxy object from which your test case will interact with your host application on. Next, in the setup function, make sure to instantiate the XCUIApplication object and make sure the continueAfterFailure flag is set. Setting up the continueAfterFailure flag will allow your application to continue even if a failure occurs in your test.
import XCTest
import Foundation

class AgnosticDevelopmentTableViewUITests: XCTestCase {

    var app: XCUIApplication!

    override func setUp() {
        super.setUp()

        // In UI tests it is usually best to stop immediately when a failure occurs.
        continueAfterFailure = false
        app = XCUIApplication()

    }

    override func tearDown() {
        // Put teardown code here. This method is called after the invocation of each test method in the class.
        super.tearDown()
    }

    ...
}
After the XCTestCase is setup, it's time to get down to business and build out the testTableInteraction function! The first line uses the XCUIApplication object to launch the host application, just as any user would. Next, the host application object is used again to query the accessibilityIdentifier that was setup for the table view and then assert that this object is present in the application's context. This will validate that the application is in the correct state to start the overall test. After the table view is validated, gather an array of the table cells and let Swift's type inference do the heavy lifting for you be setting it to the tableCells variable.
func testTableInteraction() {
    app.launch()

    // Assert that we are displaying the tableview
    let articleTableView = app.tables["table--articleTableView"]

    XCTAssertTrue(articleTableView.exists, "The article tableview exists")

    // Get an array of cells
    let tableCells = articleTableView.cells

    ...
}
Now the fun part! Right out of the gate let's make sure that there is a valid set of UITableViewCells in the tableCells array. Once that is complete, three crucial items are needed to complete the test. First, setting up an XCTestExpectation for 20 seconds to ensure that the UI test has time to run all the way through correctly. Second, setup a for loop to iterate through each of the UITableViewCells and invoke a tap call on each on of the tableCells. This tap command takes the user to the DetailViewController with the associated article content. Third, use the host application to make sure that the test navigates back to the ViewController with the UITablewView to invoke another tap on the next UITableViewCell in the array.
Once the for loop finishes the XCTestExpectation fulfills and the XCTestCase can assert true due to the iteration of all table rows being tested!
if tableCells.count > 0 {
    let count: Int = (tableCells.count - 1)

    let promise = expectation(description: "Wait for table cells")

    for i in stride(from: 0, to: count , by: 1) {
        // Grab the first cell and verify that it exists and tap it
        let tableCell = tableCells.element(boundBy: i)
        XCTAssertTrue(tableCell.exists, "The \(i) cell is in place on the table")
        // Does this actually take us to the next screen
        tableCell.tap()

        if i == (count - 1) {
            promise.fulfill()
        }
        // Back
        app.navigationBars.buttons.element(boundBy: 0).tap()
    }
    waitForExpectations(timeout: 20, handler: nil)
    XCTAssertTrue(true, "Finished validating the table cells")

} else {
    XCTAssert(false, "Was not able to find any table cells")
}
To see an example of this UI test running on my phone, checkout the video from YouTube below:
In Summary ⌛️
Working with UI testing through XCTestCases is very powerful because it allows you to validate user interface state given a specific input. These tests also allow you to validate that your application code is wired up correctly all in one shot. The test case in this post is validating that the articles were loaded from the network correctly, the input state of the articles produces an output state of allowing a user to navigate to the DetailViewController, and finally that the application code is wired up correctly to allow that navigation to occur. UI testing is very powerful using Xcode and something I would encourage all developers to implement in their development lifecycle!
Where to go next? You can find all of the code from this post up on my Github repo here if you want to take a look of try it out on your own. Please let me know if you have any questions, comments or concerns on any of the examples I ran through. As always, thank you for reading! 😀

Member for
3 years 9 monthsLong time mobile team lead with a love for network engineering, security, IoT, oss, writing, wireless, and mobile. Avid runner and determined health nut living in the greater Chicagoland area.
Comments
Nice short tutorial
Thanks! I got value for my time. You may want to point people in the direction about using expectation. Most people can look this up but it’s a little hidden why your code requires it (you mention network IO in your conclusions). I don’t think many people get beyond the recorder and hence probably don’t realize the need for asynchronous waiting.
These kind of UI tests would be in the “penthouse” of the test automation pyramid.
Thank you!
great
Great