 Submitted by matt_eaton
on Mon, 07/08/2019 - 12:08 PM
Submitted by matt_eaton
on Mon, 07/08/2019 - 12:08 PM


A good practice to keep in mind during application development is that you can never assume what kind of network conditions your users will be facing while using your application. Some users could be on Wi-Fi, some of 4G - LTE, but most likely a lot of your users with be in conditions similar to 3G or an EDGE network, which can be a lot slower than Wi-Fi or 4G. In these cases it is important to test your application to make sure that any assumptions you programmed into your logic during development do not provide a poor user experience in adverse network conditions. A few examples of these assumptions might be too many retries or low client timeouts that can actually end up repelling users from your application in some cases. So how do you go about testing these adverse network conditions in your mobile or desktop application? Well, that is why I wanted to write this tutorial, to describe three techniques in network link condition testing, and then I wanted to provide a brief overview on how to use Automatic Link Conditioner in Xcode 11. So, let’s get started!
Note: The Xcode 11 examples here are made with macOS Catalina Beta 3 and Xcode 11 Beta 3. Proceed with caution as these items are still under development.
Pre-Xocde 11 👨💻
One tried and true method for testing adverse network conditions pre-Xcode 11 is to actually create adverse network conditions physically, and there are two ways to do this. First, if you have a MacBook and you can tether your device to the MacBook and physically go to a place where your network conditions are poor, this can be a great test to see how your logical assumptions perform in these conditions. An example of this could be going to a remote location with no visible cell towers. Another example, if you are in a more urban setting would be to go to a place heavily surrounded by concrete and steel, but make sure that you are able to still get a connection - hopefully it’s just slow.
Another technique for creating a physically poor connection is to connect your MacBook or device to a router or access point that you have administrative access over and bring up your router’s dashboard. Connect your application to the router and make sure your application runs at least one connection through the router. That way DNS will be cached. Now go to your router and restrict the bandwidth to it to something like 50kbps. Note, that this will also make your computer slow if connected, but you should now be able to start making slow connections over your router to see how your logic performs.
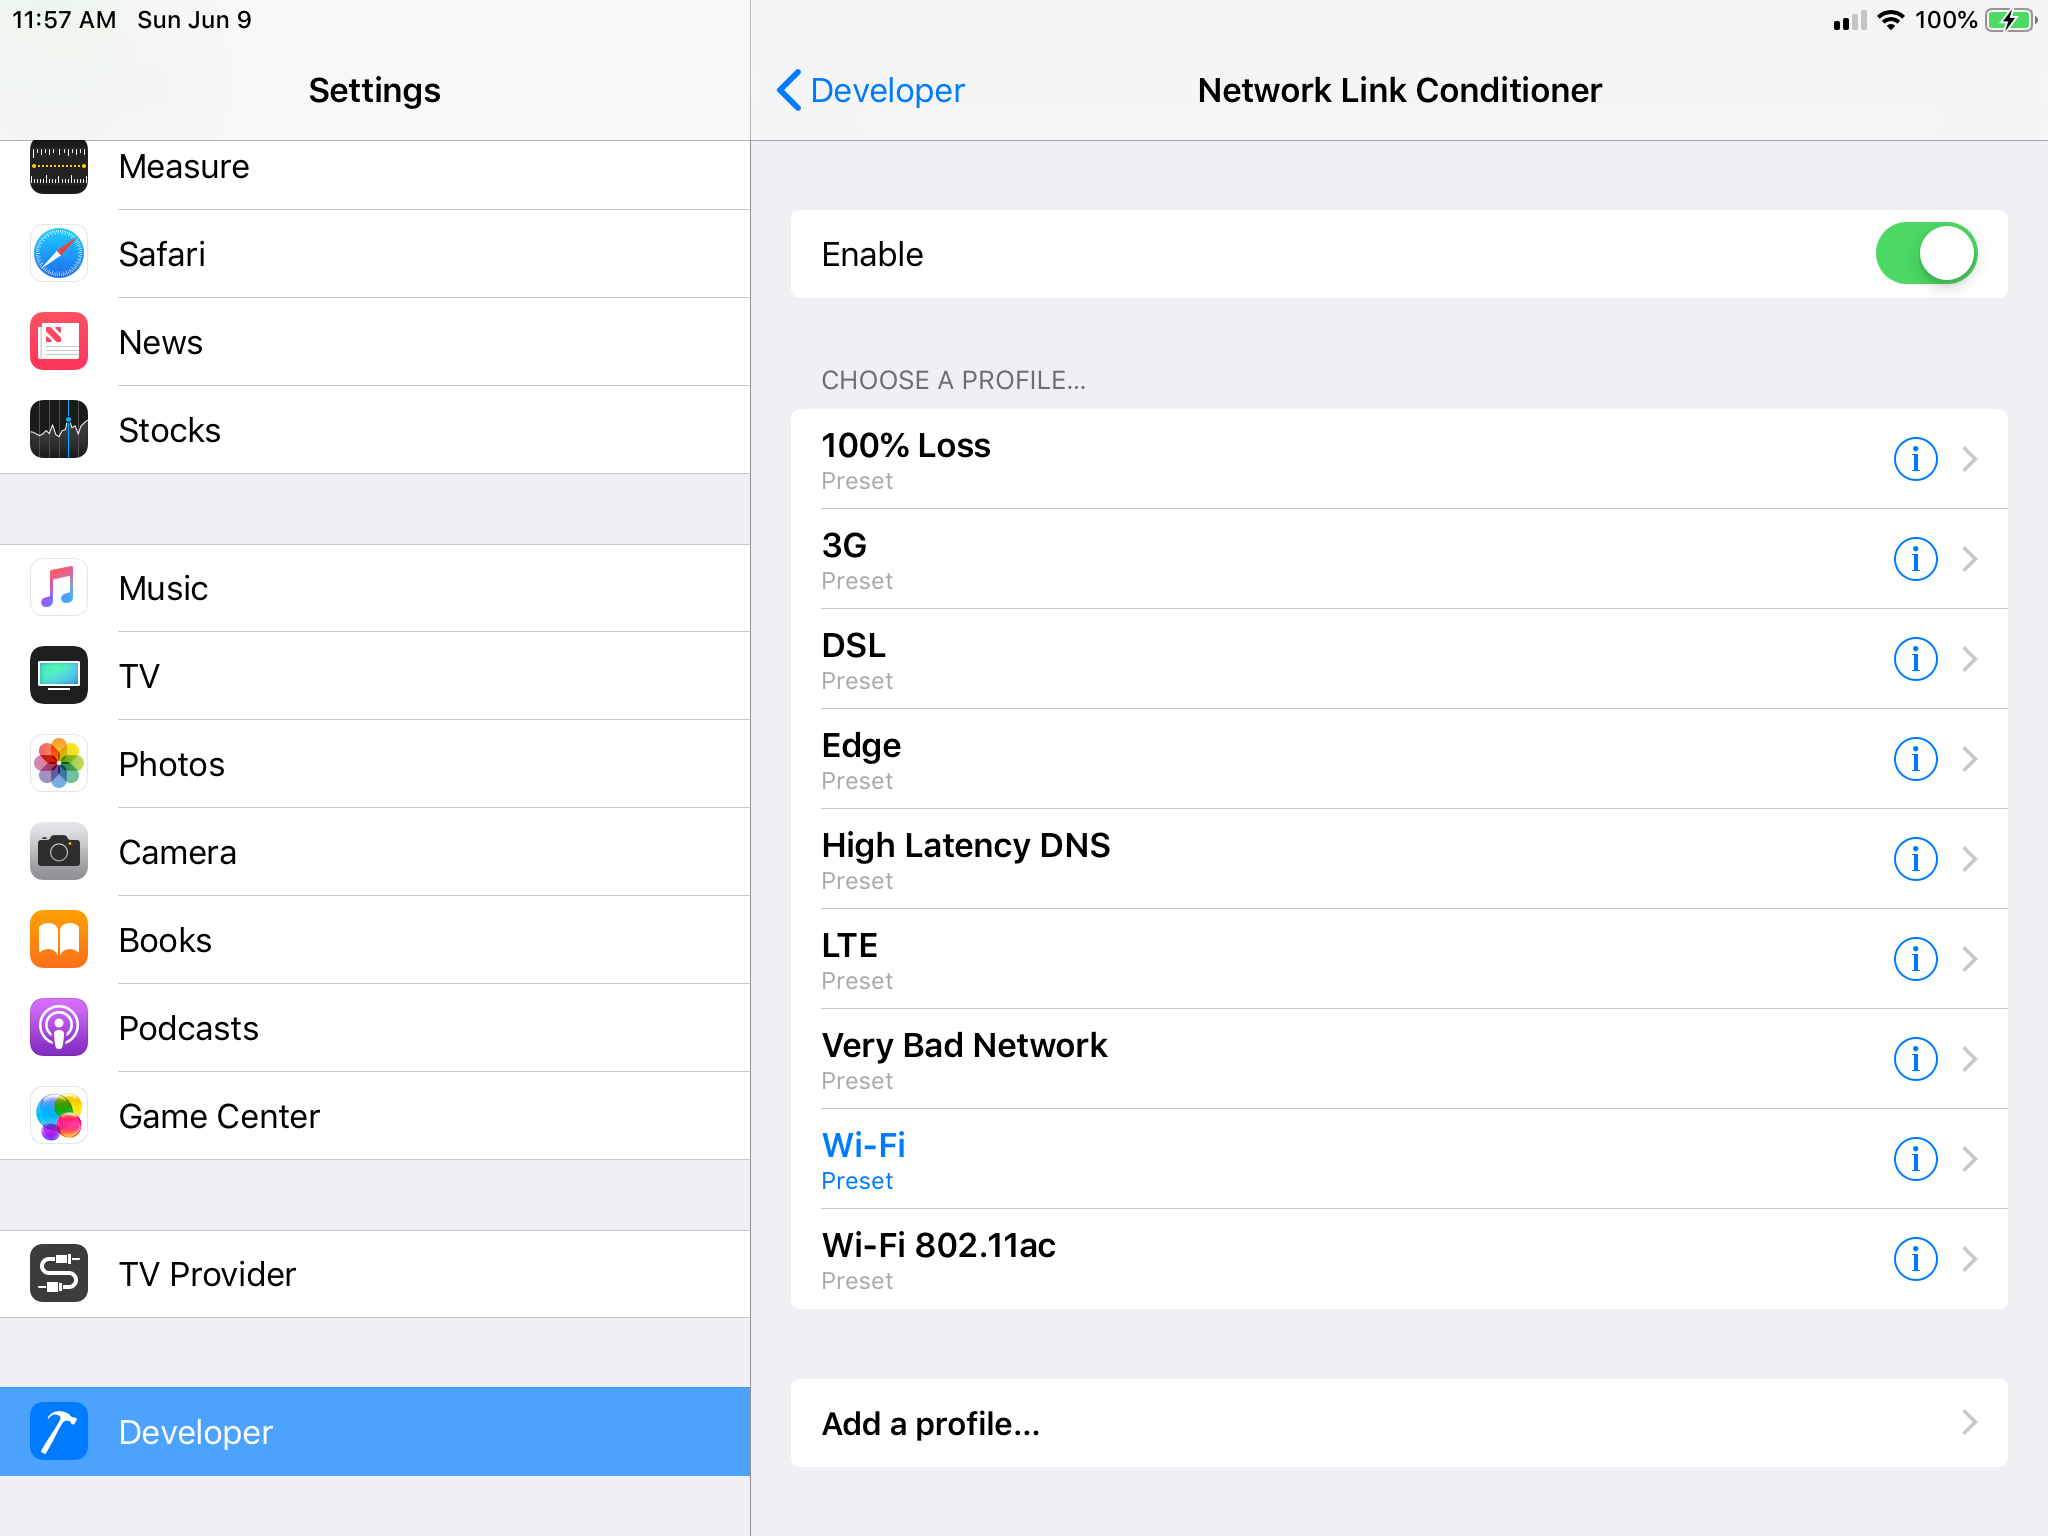
Lastly, pre-Xcode 11, you can turn on the Link Conditioner on either your desktop or your physical device to simulate a poor network link. For a device, tethered it to your MacBook, unlock your device and navigate to the Window -> Devices and Simulators menu option in Xcode and you should see your device. Wait for your device to be setup for development, if not already, and then on your device navigate to Settings -> Developer -> Network Link Conditioner. Here you can select many different types of poor network options. One thing to note is that you MUST enable the option you have selected and then disable it once you are done.
A word of advice from someone who has tested all of these techniques is that you can also take a packet trace during these tests. What this will do is allow your to specifically see where in your connection the slowdown is occurring. Maybe you payloads are too big. Maybe your DNS is very slow. Maybe your connection setup and handshake is taking way too long. These techniques can help you pin-point bottlenecks in your network requests and ultimately help you resolve it.
With Xcode 11 🚀
With the release of Xcode 11 you can now simulate a device condition with a tethered device right from the Devices and Simulators menu in Xcode. This removes the need to either configure the condition on a physical piece of hardware or go to a remote location where service is poor . To apply the link conditioner, navigate to Xcode -> Window -> Devices and Simulators. In the left side click on the tethered device and below the installed applications you should see the device conditions menu. Here you can simulate a thermal state or a network link.
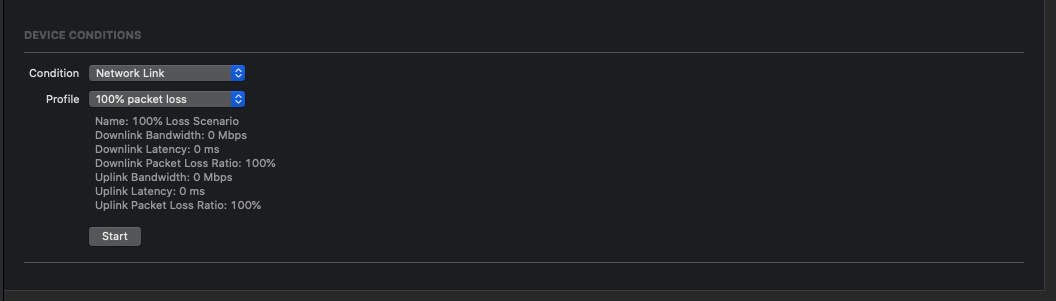
In the network profile I have selected above I have selected a condition that creates a 100% packet loss. You can see the conditions the link sets on the device, i.e., "Download Bandwidth: 0 Mbps." To begin, simply hit start and you should see a grey developer icon in the top right of your device indicating that the network link conditioner is up and running. Don't forget to hit stop when you are finished and the grey icon should go away.

Above you can see all of the different profiles to pick from to simulate a poor network link. 100% packet loss should be an almost unusable connection. This profile will simulate the absolute worst possible case. LTE and WiFi networks will simulate typical cellular and WiFi networks in use today.
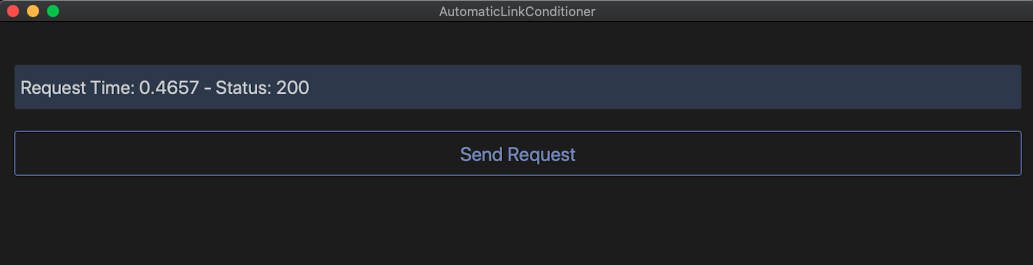
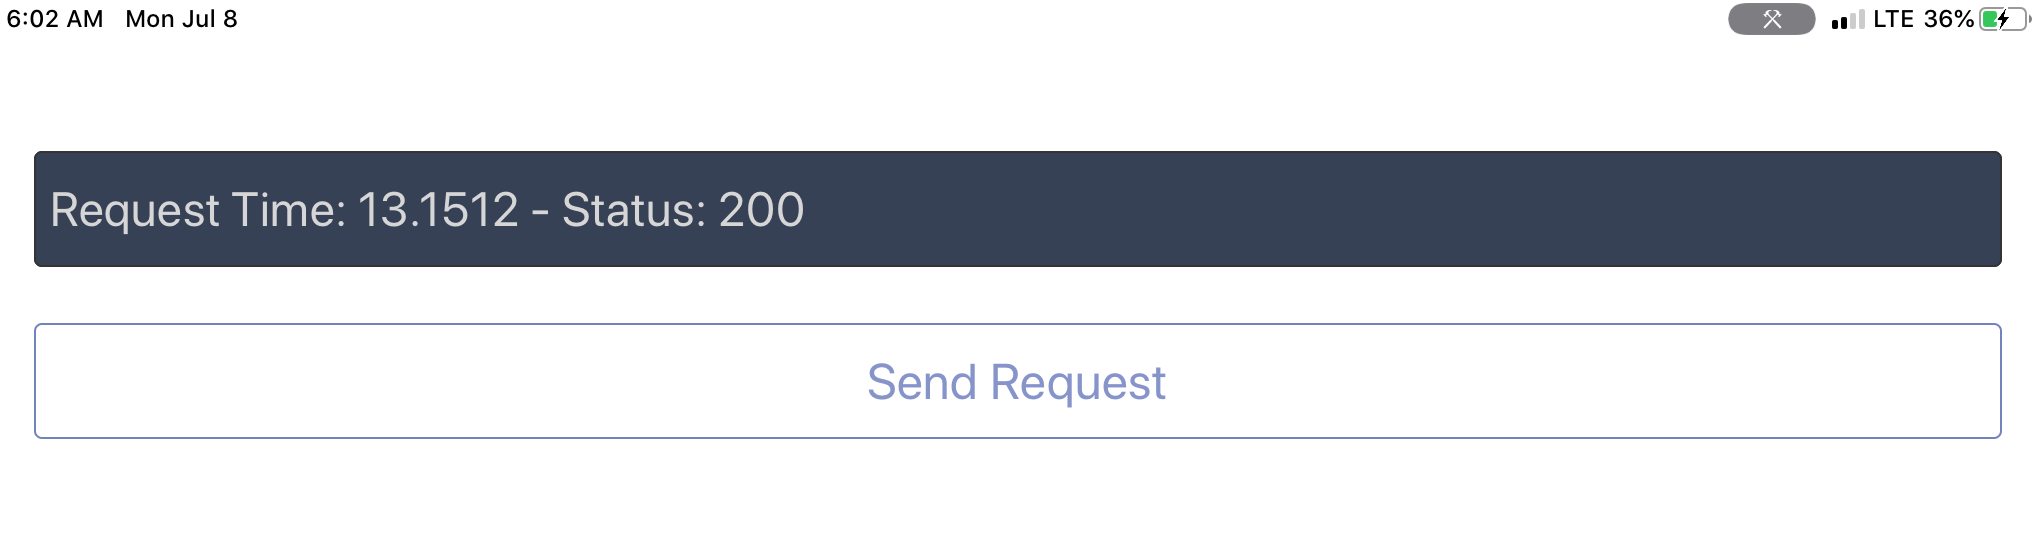
One thing to note about the automatic link conditioner setting in Xcode is that it is not portable to macOS directly if you are building for iPad and macOS. You will need to look into using the desktop link conditioner separately from the Xcode 11 option. For example, the screen shot from macOS Catalina below was build with the same network link conditioner applied to the next screen shot below on iPadOS.
macOS Catalina 10.15
iPadOS
In Summary ⌛️
In summary I hope you have now learned how to apply a network link conditioner to test your application code. There is nothing truly like seeing the poor connection occur naturally, but using the new options available in Xcode 11 helps streamline the process and reduce error of leaving the link conditioner enabled. Please let me know if you have enjoyed this tutorial or if I can expand on any of the topics in further articles or tutorials. If you have any questions, comments, or concerns please leave a comment and I will get back to you as soon as possible.
If you want to take a look at the code used for this tutorial, please checkout my Github here.

Member for
3 years 9 monthsLong time mobile team lead with a love for network engineering, security, IoT, oss, writing, wireless, and mobile. Avid runner and determined health nut living in the greater Chicagoland area.
Comments
Test with Multipath TCP
Hello,
As you might know, recent versions of iOS support Multipath TCP to provide better user experience. Apple uses Multipath TCP for Siri and soon Apple Maps and Apple Music. Is it possible with the link conditionner to specify the characteristics of two different network interfaces (say poor LTE and medium WiFi or the opposite) ?
Thanks for the post
Olivier
Olivier, that is an…
Olivier, that is an excellent question! To my knowledge, no. Link conditioning is only available for a specific link on the interface being used.
The first thought that pops into my mind would be simulating a link conditioned setting on both interfaces with Xcode and a physical device. For example, could you connect to a router and dial back the bandwidth on that router for a lease/connection/ip and then use the network link conditioner on the cellular interface?
Oliver, I am intrigued so…
Oliver, I am intrigued so much by this question that I have added this as a research topic in my backlog. I will post a follow up if my theory proves itself. Thank you again for the excellent question.
- Matt