 Submitted by matt_eaton
on Sun, 01/11/2015 - 03:12 PM
Submitted by matt_eaton
on Sun, 01/11/2015 - 03:12 PM


In part one of this post I explained the need to have a content management system detached from the web service. In part two of this post I explained how to sync the data from Drupal to MongoDB and sync it in a way that left Node.js to just read the data and serve it. So now in part three of this post the only thing left to do is build the web service to serve the read-only data on. As described in the previous posts we will be using Node.js as our application framework and Express JS as our web framework to serve up the JSON data on our web service routes. There is a couple of prerequisites first before jumping right in. Number one, you will need access to a Linux server, this will not be the same Linux server that is running your Drupal CMS and MongoDB database. In this post I will be using a CentOS server. Number two, you will need a user that has access to run commands on your server as a root user, using sudo for example.
To begin, run an update to make sure everything is up to date.
# Run an update on your server image
$ sudo yum update
Next, we will need to install the group development package to compile Node.js once we have it downloaded.
# Install the development tools
$ sudo yum groupinstall "Development Tools"
Now we can download, install, and compile Node.js.
# Make sure wget is installed
$ sudo yum install wget
$ cd /usr/src

# Pull down Node.js
$ wget http://nodejs.org/dist/latest/node-v0.10.35.tar.gz

# Untar, navigate into the directory, and configure the package before it compiled.
$ tar xvf node-v0.10.35
$ cd node-v0.10.35
$ sudo ./configure

# Now run a make call on the package.  This will take some time
$ sudo make

# Now install
$ sudo make install

# Verify that Node.js installed correctly
$ npm -v

# After Node.js installs successfully I like to clean up the old files
$ cd ..
$ rm -rf node-v0.10.35
Now it is time to add our Node.js application. To do this I would create a system user that will be in charge of maintaining your application. First create the user and then create the Node.js application folder under this new users home directory.
# Create a Node.js user
$ sudo useradd nodeuser
$ sudo usermod passwd
$ password
$ password

# Now logout as your current wheel user and log in as your nodeuser
# Create an application folder for your web service
$ mkdir service
$ cd service

# you will need to create a folder structure that looks like this
service
   -app
     --models
     ---users.js
     ---articles.js
     --config
     ---database.js
     --routes
     ---routes.js
   -server.js
   -package.json
Here is what our package.json file will look like. The package file creates a list of dependencies that npm will use to go out and pull down to your local application to give it extra functionality.
{
    "name": "service",
    "main": "server.js",
    "dependencies": {
        "express": "~4.0.0",
        "mongoose": "~3.6.13",
        "body-parser": "~1.0.1",
        "cookie-parser": "~1.0.0",
        "morgan": "~1.0.0",
        "method-override": "~1.0.0",
    	"express-session": "~1.0.0"
    }
}
Here is what our model file for users.js will look like. In this file mongoose is used to build out a schema for a user object that is represented in you MongoDB database. Since I did not show a previous model for users in my last post I will only show a couple of fields as an example of how this works. The mongoose documentation on how you can build out extensive models can be found here: Mongoose Docs.
//model file to build out users
var mongoose     = require('mongoose');
var Schema       = mongoose.Schema;

var UsersSchema   = new Schema({
    uid: String,
    name: String,
    created: Date,
    status: Boolean,
    email: String,
    image: String,
});

module.exports = mongoose.model('users', UsersSchema);
Here is what the model file for articles.js will look like. Again, this is just a brief example of what a model could look like since I did not provide a schema in my last post.
//model file to build out users
var mongoose     = require('mongoose');
var Schema       = mongoose.Schema;

var ArticlesSchema   = new Schema({
    nid: String,
    title: String,
    created: Date,
    status: Boolean,
    body: String,
    image: String,
});

module.exports = mongoose.model('articles', ArticlesSchema);
Here is what the database.js will look like. This file basically connects your Node.js application with the MongoDB server that holds the JSON data.
module.exports = {

   // Bring Mongoose into the app
	var mongoose = require( 'mongoose' );

	// The connection string, replace 0.0.0.0 with the IP of the server Drupal and MongoDB are on
	var dbURI = 'mongodb://drupalUser:drupalPassword@0.0.0.0:27017/drupalData';

	// Create the connection
	mongoose.connect(dbURI);


	// If successfully connected
	mongoose.connection.on('connected', function () {
	  console.log('Mongoose default connection open to ' + dbURI);
	});

	// If the connection throws an error
	mongoose.connection.on('error',function (err) {
	  console.log('Mongoose default connection error: ' + err);
	});

	// When the connection is disconnected
	mongoose.connection.on('disconnected', function () {
	  console.log('Mongoose default connection disconnected');
	});

	// If the Node process ends, close the Mongoose connection
	process.on('SIGINT', function() {
	  mongoose.connection.close(function () {
	    console.log('Mongoose default connection disconnected through app termination');
	    process.exit(0);
	  });
	});
};
Here is where Express JS fits into the mix. We will use Express to build out our web service routes and when a specific piece of data is requested we can serve the data from MongoDB on these routes using JSON. Notice the middle ware function that is currently not being used. I wanted to add this in here to demonstrate one way that you can authenticate requests before you serve up the data. Another good way to authenticated requests is by using the Node.js module Passport.
module.exports = function(app) {

	var express          = require('express');
	var Users            = require('../models/users');
	var Articles         = require('../models/articles');
	var router           = express.Router();

	// middleware to use for all requests
	router.use(function(req, res, next) {

	    // perform logging here
	    // perform authentication here
	    // perform validations here
	    // track analytics here

	    //right now the request is just passed right along for demo purposes
	    next();
	});


	//*********** User Routes ***********
	//get a user by there uid
	router.route('/user/:uid').get(function(req, res) {
	    //use the find
	    Users.find({uid: req.params.uid}, function(err, user) {
	        if (err)
	            res.send(err);
	        //serve the user data for the specific id requested
	        res.json(user);
	    });
	});


	//*********** Article Routes ***********
	//get an article by nid
	router.route('/article/:nid').get(function(req, res) {
	    //use the find
	    Article.find({nid: req.params.uid}, function(err, article) {
	        if (err)
	            res.send(err);
	        //serve the article data for the specific id requested
	        res.json(article);
	    });

	});

	// all of our routes will be prefixed with /service
	app.use('/service', router);
};
Now that we have setup our model, configured our database connection, and build out our routes, it is time to tie it all together with the configuration of our Node.js application. Here is what our server.js file will look like.
// Server SETUP

// call the packages we need
var express          = require('express');              // call express
var app              = express();                       // define our app using express
var port             = process.env.PORT || 8000;        // set our port
var bodyParser       = require('body-parser');
var mongoose         = require('mongoose');
var configDB         = require('./app/config/database.js');
var session          = require('express-session');
var cookieParser     = require('cookie-parser');
var morgan           = require('morgan');

// configure app to use bodyParser()
// this will let us get the data from a POST

app.use(morgan('dev')); // log every request to the console
app.use(cookieParser()); // read cookies (needed for auth)
app.use(bodyParser.urlencoded({ extended: true }));
app.use(bodyParser.json());

// ROUTES FOR OUR WEB SERVICE
require('./app/routes/routes')(app); // pass our application into our routes

// START THE SERVER
app.listen(port);
At this point if you navigate into the root of the service directory and run the npm command to install, npm should create a folder callled node_modules to pull down all of the code Node.js need to run you application before you fire it up.
# Install the application dependencies
$ npm install
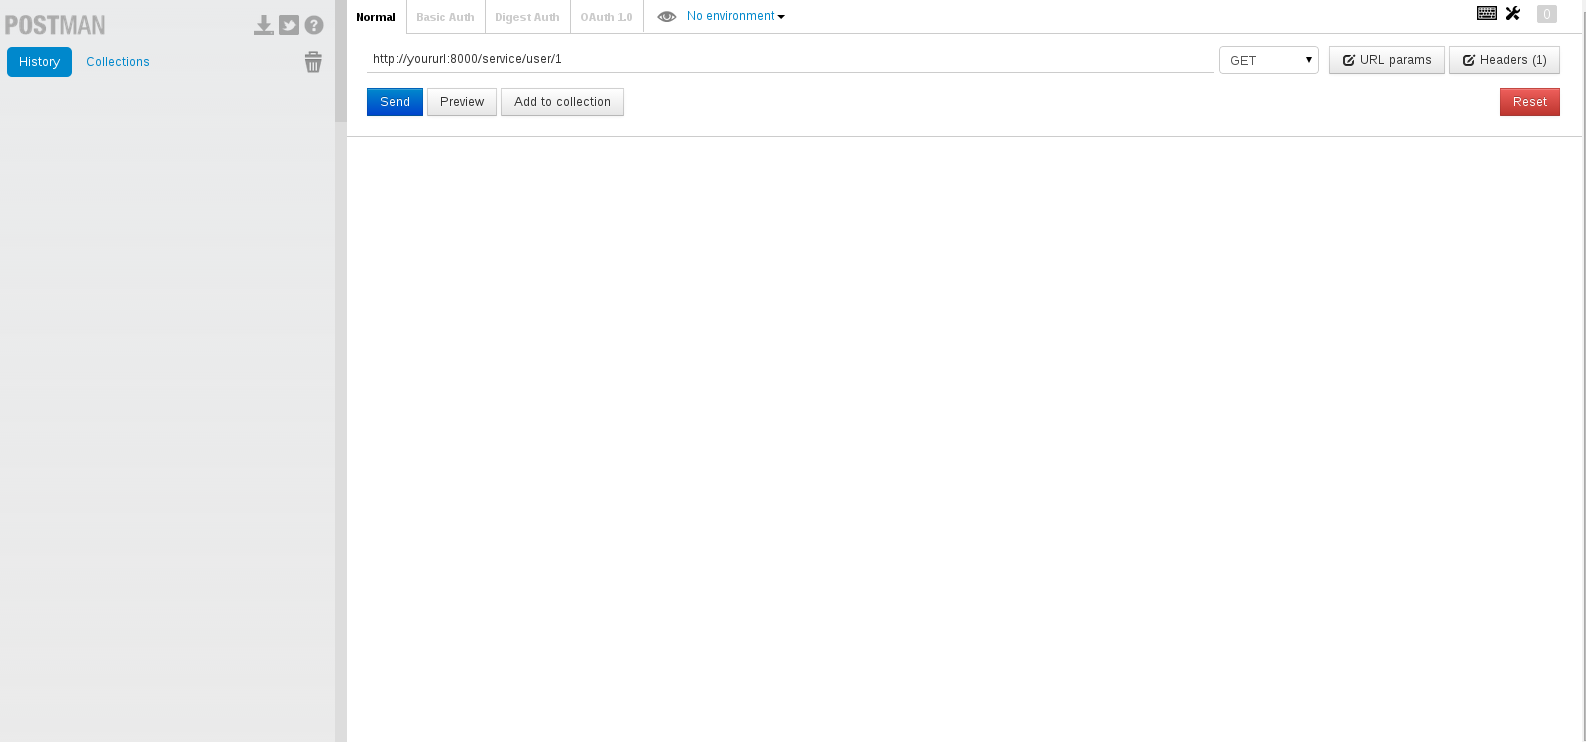
Now you should be able to start you application an test it without any issues. To test the application you can use the Chrome extension POSTMAN.
# Start Node.js
$ node server.js

# Start sending requests!
At this point you should be able to make requests to Node.js and see the data from your Drupal site be server up in POSTMAN. If you cannot get data to serve from MongoDB, but Node.js is working fine, test the database connect between servers.
So you may have noticed that the only way to make requests against your web service is using your IP address on your web server. If you do not want to do that, you can install nginx to serve your web service routes instead of you IP. To do this you will need to have access to run commands as root, so you may need to log out as you nodeuser and log back in as your sudo user.
# Start by adding the repo file for nginx

$ sudo nano /etc/yum.repos.d/nginx.repo

[nginx]
name=nginx repo
baseurl=http://nginx.org/packages/centos/$releasever/$basearch/
gpgcheck=0
enabled=1
Once the nginx repo is there, install nginx with YUM.
# Install nginx with YUM
$ sudo yum install nginx
Next setup a reverse proxy configuration with nginx with the virtual file here:
# Setup a reverse proxy configuration
$ sudo nano /etc/nginx/conf.d/virtual.conf

server {
    listen 80;

    server_name read.example.com;

    location / {
        proxy_pass http://localhost:8000;
        proxy_http_version 1.1;
        proxy_set_header Upgrade $http_upgrade;
        proxy_set_header Connection 'upgrade';
        proxy_set_header Host $host;
        proxy_cache_bypass $http_upgrade;

    }
}
Once the configuration file has been saved, restart the nginx daemon.
#Restart the nginx daemon
$ sudo service nginx restart
At this point you should be all set to serve your read-only requests on your Node.js web service using a regular host name. This last piece to the puzzle will allow us to offload a ton request from the Drupal end to a more lightweight and capable application framework that is designed to scale up or down based upon the load it is under. Please let me know if you have any questions, comments, or concerns about this setup or anything other that I may have missed. Thanks!

Member for
3 years 9 monthsLong time mobile team lead with a love for network engineering, security, IoT, oss, writing, wireless, and mobile. Avid runner and determined health nut living in the greater Chicagoland area.